Booting Embedded Linux in One Second !

  • 0

Booting Embedded Linux in One Second !

Booting a device as fast as possible is not only a requirement for time critical applications but also an important facet for improving the usability and user experience.
Most of the Embedded Linux distribution are designed to be generic and flexible to support variety of devices and use cases, therefore the boot-time aspect is not an important focus.
Thanks to its modularity and open source nature it is possible to reduce the boot-time and and achieve some spectacular results just using optimization techniques which does not require any considerable engineering effort.
we will cover in this article an ARM based systems and show a practical example of those tweaks applied to boot a Yocto based Linux on a Beaglebone Black in the blink of an eye:

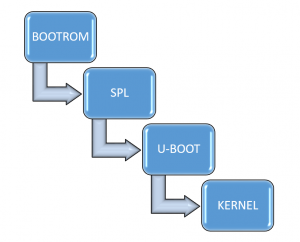
Before starting any optimizations let’s get a closer look at a typical Embedded Linux boot-up sequence on an ARM processor and analyze how time is spent on each stage :

Boot Sequence on Sitara AM335x


Initial measurements

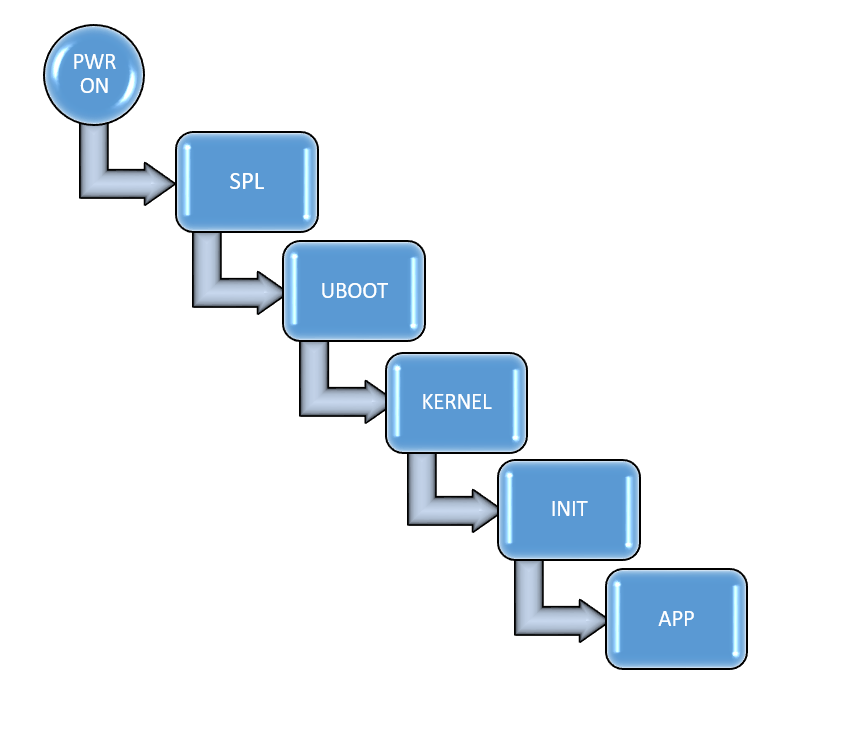
For our example on Beaglebone black the application is an In-vehicle infotainment (IVI) QT5 based connected application and the goal is to reduce the time from Power-On of the device (Cold-Boot) until the application shows up on the display and fully operable by a user.

To measure the time taken by the application to show its availability, we will use grabserial running on a Host (Ubuntu Linux) to measure time-stamps coming from the target on the serial console:

$ grabserial -d "/dev/ttyUSB0" -e 30 -t -m "U-Boot SPL*"

Important to note that grabserial cannot measure from power-on but starts counting time-stamps upon getting the first character on serial console. In the measurement above we set the time base to SPL using -m option.

Our application needed more than 12 seconds to start-up, from special markers present in the serial logs, we can deduce the time spent on each stage:

such time to start an Infotainment system in the car are unacceptable for an impatient end user.

Optimizations

As a recommendation, do not optimize things that reduce the ability to make measurements and hinder implementing further optimizations.

We start then from the last stage of the boot process, by optimizing the user-space and application start-up, then reduce kernel boot-time. Finally optimize the boot-loader(s).

User Space

Init Process:

One obvious optimization is to configure the Start of the critical application as soon as possible, of course after starting dependencies. In our case we use Systemd so we change the default target from multi-user to basic and remove dependencies to other services as follow:

[Unit]
Description=ConnectedCarIVI service
DefaultDependencies=no

[Service]
ExecStart=/usr/bin/ConnectedCarIVI -plugin Tslib

[Install]
WantedBy=basic.target

As Systemd has an overhead, specially if not running on a multi-core CPU, we can start our application before Systemd initialization by creating a wrapper to init:

#!/bin/busybox sh

echo "-> Start Application..."

#Initialize your time-critical application here !
/usr/bin/ConnectedCarIVI -plugin Tslib &

echo "-> Application started !"

# start real init (systemd/SysVinit)
exec /sbin/init

and instruct the kernel to use it instead of the default /sbin/init, by adding it to kernel command line:  init=/sbin/preinit

A drawback of this Setup is that your application loses some benefits of Systemd such as auto-restart after crash.

If there are many interdependent processes in play, systemd-analyze can be used to inspect those dependencies and reorder their priorities.

Application:

In our example, Qt application alone took almost 0,7s to run!

That could be definitely improved by:

  • choosing toolchains and compiler flags wisely, a new gcc build a faster code, compiler flags set with optimization flags: for example -O2 instead of -Os
  • compiling statically if possible. This will remove the overhead of using shared libraries
  • use prelink which reduce the time needed by dynamic linker to perform relocations
  • in case of a Qt QML based application, using QtQuickCompiler allows to compile QML source code into a binary that runs faster


Root-Filesystem:

Before running the init process, the Kernel needs first to mount the root Filesystem, therefore size and choice of the Filesystem have impact on startup time.

Filesystem Size

Size matters but in this case a smaller footprint will have less mount time. Here are some tweaks to reduce the footprint of a Yocto based Root Filesystem :

  • remove DISTRO features that are not used in local.conf:
    DISTRO_FEATURES_remove = "bluetooth"
    DISTRO_FEATURES_remove = "3g"
    DISTRO_FEATURES_remove = "opengl"
    DISTRO_FEATURES_remove = "wayland"
    DISTRO_FEATURES_remove = "x11"
    DISTRO_FEATURES_remove = "nfc"
    DISTRO_FEATURES_remove = "nfs"
    DISTRO_FEATURES_remove = "ext2"
  • remove unnecessary packages and dependencies from image recipes
  • finally use a lightweight C-library such as musl instead of default glibc:
    TCLIBC=musl MACHINE=my-machine bitbake my-image


Filesystem Type

Depending on the storage type an appropriate Filesystem can be used:

In case of eMMC/MMC, EXT3 or EXT4 are widely used but they have an overhead in compared to other Filesystems such as SquashFS (Read-only):

In Yocto this could be easily generated by selecting:

IMAGE_FSTYPE += "squashfs"

or if using wic kickstart :

part / --source rootfs --ondisk mmcblk --fstype=squashfs  --label root --size 150M

The kernel cmdline need to include:

rootfstype=squashfs


KERNEL

This is an important part of the optimization since a big part of our boot process was spent at this stage.

here are few steps we performed to speed-up kernel loading and execution:

  • build everything that is not needed at boot time as a kernel module
  • reduce Kernel configuration to strict minimum drivers and features that the application need, this implies a lot of trial and error
  • remove from device tree redundant devices or set their status to disabled
  • avoid calibration of loop delay by presetting the value to kernel command line lpj=1990656
  • turn off console output by setting quiet option to command line or disabling  completely printk, which also significantly reduces the kernel size
  • benchmark compressed versus non-compressed Kernel, on our board the decompression went faster than loading an uncompressed image
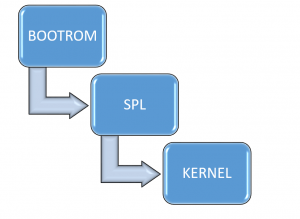
 

BOOTLOADER

We enabled falcon-mode to bypass u-boot and focused only on optimizing SPL startup: See our Article about how to enable falcon mode

We disabled in SPL all features that are not required for production such as Networking, USB, YModem, Environment, EFI and Filesystems support:

CONFIG_SPL_MUSB_NEW_SUPPORT=n
CONFIG_SPL_EXT_SUPPORT=n
CONFIG_SPL_FAT_SUPPORT=n
CONFIG_SPL_ETH_SUPPORT=n
CONFIG_SPL_LIBDISK_SUPPORT=n
CONFIG_DRIVER_TI_CPSW=n
CONFIG_SPL_USBETH_SUPPORT=n
CONFIG_SPL_MUSB_NEW_SUPPORT=n
CONFIG_SPL_YMODEM_SUPPORT=n
CONFIG_SPL_EFI_PARTITION=n
CONFIG_SPL_DOS_PARTITION=n
CONFIG_SPL_ENV_SUPPORT=n

As we disabled Filesystems support to have less overhead, Boot-Rom code is loading SPL from Raw MMC partition using specific offsets.

We aslo avoided slow bus initialization such as I2C, for example in the board file we removed the code responsible for board detection using I2C/EEPROM and hard-coded the board type to beaglebone black:

index 48c139a..18c7942 100644
--- a/board/ti/am335x/board.h
+++ b/board/ti/am335x/board.h
@@ -26,27 +26,27 @@
 
 static inline int board_is_bone(void)
 {
-       return board_ti_is("A335BONE");
+       return 0;
 }
 
 static inline int board_is_bone_lt(void)
 {
-       return board_ti_is("A335BNLT");
+       return 1;
 }
 
 static inline int board_is_bbg1(void)
 {
-       return board_is_bone_lt() && !strncmp(board_ti_get_rev(), "BBG1", 4);
+       return 0;
 }
 
 static inline int board_is_evm_sk(void)
 {
-       return board_ti_is("A335X_SK");
+       return 0;
 }
 
 static inline int board_is_idk(void)
 {
-       return !strncmp(board_ti_get_config(), "SKU#02", 6);
+       return 0;
 }
 
 static inline int board_is_gp_evm(void)
@@ -56,13 +56,12 @@ static inline int board_is_gp_evm(void)
 
 static inline int board_is_evm_15_or_later(void)
 {
-       return (board_is_gp_evm() &&
-               strncmp("1.5", board_ti_get_rev(), 3) <= 0);
+       return 0;
 }
 
 static inline int board_is_icev2(void)
 {
-       return board_ti_is("A335_ICE") && !strncmp("2", board_ti_get_rev(), 1);
+       return 0;
 }
 
 /*

All changes made for SPL can be found here.


HARDWARE CONSIDERATIONS

Last but not least, hardware settings can have an impact on boot time. For example the Boot Rom may lose precious time by trying to fetch software from wrong media if the bootstrap pins configuration is not correctly set .

On our board, we also noticed that boot up from internal eMMC configured in SLC Mode is a bit faster than default MLC mode configuration, and even faster than using a fast SD-Card(Class 10).


CONCLUSION

we succeeded in reducing the boot time from 12 second to one second with optimizing different components of the software. The startup time could be further shortened but at cost of the system flexibility.


  • 0

Fast Boot Linux with u-Boot Falcon Mode

Falcon mode is a feature in u-Boot that enables fast booting by allowing SPL directly to start Linux kernel and skip completely u-boot loading and initialization.

To understand how Falcon mode works let’s first have a quick look at a typical Linux boot-up sequence on an ARM processor:

Standard Linux Boot Process

1. First stage – Boot ROM

This is the primary program loader residing on a read-only flash memory (ROM) integrated directly into the processor chip.
It contains the very first code which is executed on power-on or reset.
Depending on the configuration of the bootstrap pins or internal fuses it may decide from which media to load and run the next piece of software. In case of a Secure Boot processor it will also verify the code authenticity before its execution.
At this stage, Boot ROM code is not aware about memory type and different interconnected peripherals.
The main goal here is to perform basic peripherals initialization such as PLLs, system clocks setup then find a boot device from which load a bootloader such as u-Boot.

2. Second stage – SPL

A typical u-Boot image is around few hundreds KB size (~300KB) which does not fit inside internal SRAM of most ARM processor. They are typically less than 100KB.
To handle this limitation, u-Boot adopted the SPL (Secondary Program Loader) approach which consists of creating a very small pre-loader that after configuring and initializing peripherals and the main system memory can load the full blown u-Boot.
It shares the same u-Boot’s sources but with a minimal set of code.
So when u-Boot is built for a platform that requires SPL, it generate two binaries : SPL (MLO file) and u-Boot image.

3. Third stage – u-Boot

Das u-Boot aims to offer a flexibel way to load and start the Linux Kernel from a different type of devices, it also provides rich features for a bootloader, such as a command line interface, Shell Scripting, Support of a variety of Filesystems, networking and other options that are very helpful during initial Hardware Bring-Up and development process, but can be bypassed for the production by enabling the Falcon-Mode and save by the way some precious seconds of the boot time !

Falcon Mode

Configure and enable Falcon-Mode

We will use a Beaglebone Black  as hardware example to showcase the setup, booting either from an eMMC or SD Card. Nevertheless the procedure should be almost identical to other ARM based boards supporting the SPL framework.

If Boot Rom Code support it, we recommend to store and boot the SPL from raw partition and by this mean also u-Boot and Linux Kernel to skip the overhead of using a Filesystem. As result the boot is even  faster !

Partition # Name Description Offset range (Bytes) Offset range (Blocks*) Size
1 MBR Master Boot Record 0x000000 – 0x010000 0x0000 – 0x007F 64KB
2 FDT Device Tree + ARGS 0x010000 – 0x040000 0x0080 – 0x01FF 192KB
4 SPL*   SPL 0x040000 – 0x060000 0x0200 – 0x02FF 128KB
5 U-Boot Full Bootloader 0x060000 – 0x0e0000 0x0300 – 0x06FF 512KB
6 U-Boot Env U-Boot environment 0x0e0000 – 0x120000 0x0700 – 0x08FF 256KB
7 Kernel Linux Kernel 0x120000 -0x1000000 0x0900 – 0x28FF 14MB


SPL* offset is the address from which the Boot ROM can fetch bootloader. This address is hard coded in the Boot ROM and specific to processor.

In case of AM335x there are 4 possibilities at 0x0, 0x20000,0x40000, 0x60000 [chapter 26.1.7.5.5 in the technical refrence manual ].

[1 x Block is 512 Bytes]

We are going to use u-boot  v2017.05-rc3:

$ git clone git://git.denx.de/u-boot.git

$ git checkout v2017.05-rc3

U-boot offset location is defined in the sources by the following config :

CONFIG_SYS_MMCSD_RAW_MODE_U_BOOT_SECTOR 0x300

Kernel offset location is defined in the sources by the following config :

CONFIG_SYS_MMCSD_RAW_MODE_KERNEL_SECTOR 0x900

Environment offset location and size are defined by the following configs:

#define CONFIG_ENV_OFFSET 0x0e0000

#define CONFIG_ENV_SIZE (128 << 10)

Configs above are default in u-Boot apart from environment config which can be set in the board config file as follow:

diff --git a/include/configs/am335x_evm.h b/include/configs/am335x_evm.h
index fc8a08f..c1408e7 100644
--- a/include/configs/am335x_evm.h
+++ b/include/configs/am335x_evm.h
@@ -340,9 +340,8 @@
"-(rootfs)"
#elif defined(CONFIG_EMMC_BOOT)
#define CONFIG_ENV_IS_IN_MMC
-#define CONFIG_SYS_MMC_ENV_DEV 1
-#define CONFIG_SYS_MMC_ENV_PART 2
-#define CONFIG_ENV_OFFSET 0x0
+#define CONFIG_SYS_MMC_ENV_DEV 0
+#define CONFIG_ENV_OFFSET 0x0e0000
#define CONFIG_ENV_OFFSET_REDUND (CONFIG_ENV_OFFSET + CONFIG_ENV_SIZE)
#define CONFIG_SYS_REDUNDAND_ENVIRONMENT
#define CONFIG_SYS_MMC_MAX_DEVICE 2

Make sure that Falcon Mode config is enabled :

#define CONFIG_SPL_OS_BOOT 1

Let’s configure now u-boot for the beaglebone black :

$ make ARCH=arm am335x_boneblack_defconfig
  HOSTCC  scripts/basic/fixdep
  HOSTCC  scripts/kconfig/conf.o
  SHIPPED scripts/kconfig/zconf.tab.c
  SHIPPED scripts/kconfig/zconf.lex.c
  SHIPPED scripts/kconfig/zconf.hash.c
  HOSTCC  scripts/kconfig/zconf.tab.o
  HOSTLD  scripts/kconfig/conf
#
# configuration written to .config
#

Build it using an arm cross-compiler for example yocto toolchains:

$ make ARCH=arm CROSS_COMPILE=arm-poky-linux-gnueabi-

If everything went well, MLO and u-boot.img files should generated in the top directory.

Now we are ready to write them adding the Kernel and Device Tree to SD card using the address table above:

dd if=am335x-boneblack.dtb of=/dev/mmcblk0 bs=1 seek=65536 (offset 0x010000)
dd if=MLO of=/dev/mmcblk0 bs=1 seek=262144 (offset 0x040000)
dd if=u-boot.img of=/dev/mmcblk0 bs=1 seek=393216 (offset 0x060000)
dd if=uImage of=/dev/mmcblk0 bs=1 seek=1179648 (offset 0x120000)

In case of using Yocto we can easily generate an image to flash on SD Card/eMMC using the following wic kickstart file:

part fdt    --source rawcopy  --sourceparams="file=uImage-am335x-boneblack.dtb" --ondisk mmcblk --no-table --align 64
part spl    --source rawcopy  --sourceparams="file=MLO" --ondisk mmcblk --no-table --align 256
part uboot  --source rawcopy  --sourceparams="file=u-boot.img" --ondisk mmcblk --no-table --align 384
part kernel --source rawcopy  --sourceparams="file=uImage" --ondisk mmcblk --no-table --align 1152

part / --source rootfs --ondisk mmcblk --fstype=ext4 --label root --align 16384

Note that Falcon-Mode supports only uImage Kernel format !

Now let’s start our board using the previous image and configure it to use falcon-mode:

we set first the bootargs:

U-Boot SPL 2017.05-rc3-dirty (May 04 2017 - 22:54:01)
Trying to boot from MMC1


U-Boot 2017.05-rc3-dirty (May 04 2017 - 22:12:24 +0200)

CPU : AM335X-GP rev 2.1
I2C: ready
DRAM: 512 MiB
MMC: OMAP SD/MMC: 0, OMAP SD/MMC: 1
Net: cpsw, usb_ether
Press SPACE to abort autoboot in 2 seconds
=>
=> setenv args_mmc 'setenv bootargs console=${console}\
 ${optargs} root=/dev/mmcblk0p1 ro rootfstype=${mmcrootfstype}'

overwrite loadfdt and loadimage macros to use raw partitions:

=> setenv loadfdt 'mmc read ${fdtaddr} 80 180'
=> setenv loadimage 'mmc read ${loadaddr} 900 2000'

then change the bootcmd to reflect our changes:

=> setenv bootcmd 'run args_mmc; run loadfdt; run loadimage;\
bootm ${loadaddr} - ${fdtaddr}'

=> saveenv

we run spl export command from u-Boot to prepare for the SPL everything that should be in place as if bootm to be executed:

=> run args_mmc
=> run loadimage

MMC read: dev # 0, block # 2304, count 8192 ... 8192 blocks read: OK
=> run loadfdt

MMC read: dev # 0, block # 128, count 384 ... 384 blocks read: OK

=>
=> spl export fdt ${loadaddr} - ${fdtaddr}
## Booting kernel from Legacy Image at 82000000 ...
 Image Name: Linux-4.4.61-beagleboard.org
 Created: 2017-05-04 10:55:09 UTC
 Image Type: ARM Linux Kernel Image (uncompressed)
 Data Size: 2641896 Bytes = 2.5 MiB
 Load Address: 80008000
 Entry Point: 80008000
 Verifying Checksum ... OK
## Flattened Device Tree blob at 88000000
 Booting using the fdt blob at 0x88000000
 Loading Kernel Image ... OK
 Loading Device Tree to 8ffee000, end 8ffff310 ... OK
subcommand not supported
 Loading Device Tree to 8ffd9000, end 8ffed310 ... OK
Argument image is now in RAM: 0x8ffd9000
The spl export command does not persist to media so we have to overwrite
the prepared FDT from RAM offsets 8ffd9000 to 8ffed310 into the FDT partition:
mmc write ${fdtaddr} 80 180

Finally we are ready to switch-on the falcon mode :

=> setenv boot_os 1
=> saveenv
=> reset

On the next boot we see that SPL jumped directly to Linux kernel :

[0.000011 0.000011] 
[0.000206 0.000195] U-Boot SPL 2017.05-rc3-dirty (May 04 2017 - 22:01:09)
[0.093199 0.092993] Trying to boot from MMC1
[1.434341 1.341142] systemd 230 running in system mode. (-PAM -AUDIT -SELINUX +IMA -APPARMOR +SMACK +SYSVINIT +UTMP -LIBCRYPTSETUP -GCRYPT -GNUTLS +ACL +XZ -LZ4 -SECCOMP +BLKID -ELFUTILS +KMOD -IDN)
[1.449622 0.015281] Detected architecture arm.
[1.452503 0.002881] 
[1.452528 0.000025] Welcome to Embexus-Linux 1.0 (Guacamole)!

In other articles we will cover further techniques used to achieve a Faster Linux Boot, stay tuned !


  • 0

Create a custom Linux Distribution using Yocto

Category : Yocto

The Yocto Project is an open source collaboration project that provides templates, tools and methods to help creating a custom Linux-based systems for embedded products regardless of the hardware architecture.

Yocto Project uses Poky as a reference distribution but it can also creates a custom one. The purpose of this article is to show how to create, configure and build an alternative Yocto based embedded Linux Distribution.

Our custom distribution example mydistro extends the basic settings of Poky and uses alternate distro features and configurations such as systemd as init system and ipk as package manager.

A good practice is to isolate the distro configuration into a separate layer meta-mydistro:

First step is to checkout a local copy of the poky project :

$ mkdir -p ~/Projects/mydistro-oe

$ git clone -b master git://git.yoctoproject.org/poky ~/Projects/mydistro-oe

$ cd ~/Projects/mydistro-oe

$ source oe-init-build-env

Let’s create the corresponding distro layer meta-mydistro using yocto-layer tool:

$ yocto-layer create meta-mydistro -o ~/Projects/-oe/meta-mydistro

Please enter the layer priority you'd like to use for the layer: [default: 6]
Would you like to have an example recipe created? (y/n) [default: n] n
Would you like to have an example bbappend file created? (y/n) [default: n] n

New layer created in ~/Projects/mydistro-oe/meta-mydistro

Now we can define our distro settings by creating a configuration file:

meta-mydistro/conf/distro/mydistro.conf

# Distro Layer configuration
# include and overwrite default poky distro
include conf/distro/poky.conf
DISTRO = "mydistro"
DISTRO_NAME = "MyDistro-Linux"
DISTRO_VERSION = "1.0"
DISTRO_CODENAME = "Guacamole"
SDK_VENDOR = "-mydistro-sdk"
SDK_VERSION="${DISTRO_VERSION}"
MAINTAINER = "info@mydistro.com"

TARGET_VENDOR = "-mydistro"

# Override these in poky based distros
MYDISTRO_DEFAULT_DISTRO_FEATURES = "bluetooth ext2 usbgadget usbhost wifi xattr nfs zeroconf 3g"
MYDISTRO_DEFAULT_EXTRA_RDEPENDS = "packagegroup-core-boot"
MYDISTRO_DEFAULT_EXTRA_RRECOMMENDS = "kernel-module-af-packet"

DISTRO_EXTRA_RDEPENDS += " ${MYDISTRO_DEFAULT_EXTRA_RDEPENDS}"
DISTRO_EXTRA_RRECOMMENDS += " ${MYDISTO_DEFAULT_EXTRA_RRECOMMENDS}"

DISTRO_FEATURES ?= "${MYDISTRO_DEFAULT_DISTRO_FEATURES} ${DISTRO_FEATURES_LIBC} "

PACKAGE_CLASSES = "package_ipk"

# Use systemd as init manager
DISTRO_FEATURES_append = " systemd"
DISTRO_FEATURES_BACKFILL_CONSIDERED += "sysvinit"
VIRTUAL-RUNTIME_init_manager = "systemd"
VIRTUAL-RUNTIME_initscripts = "systemd-compat-units"

Settings provided in meta-mydistro/conf/distro/mydistro.conf override similar settings that BitBake finds in the conf/local.conf file in the Build Directory.

To enable meta-mydistro layer we need to add it first to the bblayers.conf :

$ mkdir -p meta-mydistro/conf/samples
$ cp conf/bblayers.conf meta-mydistro/conf/samples/bblayers.conf.sample

and fill bblayers.conf.sample with the following:

BBLAYERS ?= " \
##OEROOT##/meta \
##OEROOT##/meta-yocto-bsp \
##OEROOT##/meta-poky \
##OEROOT##/meta-yocto-bsp \
##OEROOT##/meta-mydistro\
"

Then select mydistro as DISTRO either from bitbake or in local.conf :

$ cp conf/local.conf meta-mydistro/conf/samples/local.conf.sample

Point DISTRO variable in local.conf or local.conf.sample to use mydistro :

DISTRO ?= "mydistro"

Finally we are able to build an image using mydistro as distribution:

$ cd ~/Projects/mydistro-oe
$ TEMPLATECONF=meta-mydistro/conf/samples/ source oe-init-build-env
$ MACHINE=beaglebone bitbake core-image-minimal