Build a GPS live tracking system

  • 0

Build a GPS live tracking system

Category : IoT

GPS tracking systems are widely utilized in a multitude of applications such as fleet management, security, personal or merchandise remote monitoring.
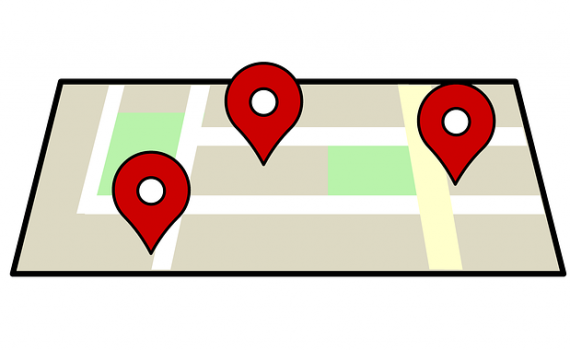
In this tutorial we will show how to build and program a mobile GPS Tracking device that is capable of streaming location coordinates to an IoT cloud and enable a real-time map view from any location/device with a simple web-browser.

1. Hardware components

IMG_20170711_134936090 IMG_20170707_163651165 IMG_20170707_163658928_HDR IMG_20170711_191437023
<
>

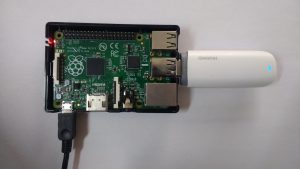
For building the prototype we choose the following off-the-shelf components:

  • Raspberry Pi or any Linux embedded device
  • GPS Module or Dongle using standard NMEA protocol
  • 3G/4G Mobile broadband modem
  • Sim Card with data plan

2. Software components

The full code and build instructions are available on github.

2.1 IoT Cloud

PubNub cloud provides a realtime messaging API for building Mobile, Web, and IoT Applications. It has SDKs supporting a large set of platforms languages and Operating Systems.

To use PubNub, you should first register for an account, create an application and add a new Key set for our GPS data streaming. For more information you can consult the Quick Start guide.

After that you will get a pair of Keys one for publishing data to a channel and other one for subscribing to it.

2.2 Embedded Software

2.2.1 Broadband connection

Follow our previous guide on how to use Ofono to enable cellular modem connection.

2.2.2 GPS interfacing

GPS modules put out typically on the serial interface a series of strings of information called the National Marine Electronics Association (NMEA) protocol.

For our use case all we need is to fetch the position, speed and time. For that parsing the $GPRMC sentences is  enough. As parsing library we use minmea, a lightweight C library:

Parsing is restricted to only RMC sentences:

minmea_sentence_id(line, false) == MINMEA_SENTENCE_RMC

If input line is not empty pack it into a rmc frame :

struct minmea_sentence_rmc frame;
if (minmea_parse_rmc(&frame, line))

Get time, speed (m/s) and coordinates (latitude, longitude) :

minmea_gettime(&ts, &frame.date, &frame.time);

/*convert speed from knot to mps*/
speed = KNT2MPS*minmea_tofloat(&frame.speed);
                    
minmea_tocoord(&frame.latitude); 
minmea_tocoord(&frame.longitude);

Those parameters are then packed into a json array :

/*format json string*/
asprintf(&gps_json_string, gps_data, 
          minmea_tocoord(&frame.latitude), 
          minmea_tocoord(&frame.longitude), 
          speed, 
          time);

gps = json_tokener_parse(gps_json_string);

Here is an output example:

[ { "latlng": [ 47.648102, 18.327868 ], "speed": 20.011890, "time": "2017-07-03 17:36:42" } ]

2.2.3 Location publishing

PubNub C-SDK is used to used to publish the data on the cloud:

The connection initialization is done using the Publish/Subscribe keys:

struct pubnub_sync *sync = pubnub_sync_init();
struct pubnub *pubnb = pubnub_init(PUBKEY, SUBKEY, 
                                   &pubnub_sync_callbacks, sync);

Publishing the json GPS data:

pubnub_publish(p,CHANNEL,data,TMOUT,NULL,NULL);

*In our code, we choose to send data only if the target is moving (speed > Threshold)

Finally verify if data was correctly sent:

if (pubnub_sync_last_result(s) != PNR_OK)
    printf("pubnub publish error!\n");

2.3 Live View Web Interface

For tracking the device and display the position in real-time on a map, we will use Mapbox and Javascript powered EON Dashboard.

The full code can be found here.

To start you will need to create a MapBox account. Once this is done, you can either create a new map design or use an existing one for example Mapbox streets.

You will also get a Mapbox authentication token to be used to connect with your account.

The Javascript code will subscribe to the PuBNub corresponding channel, fetch the position and show it on the Map in real-time.

Initialize connection to PubNub:

var pn = new PubNub({
             //replace with your own sub-key
             subscribeKey: 'sub-c-xxxxxxxx-xxxxx-xxxxx-xxxxx-xxxxxxxxxx'            
             });

Define the EON map function by providing the API access token (mbToken), map ID (mbId) and the channel used to get GPS data from:

var map = eon.map({
        pubnub: pn,
        id: 'map',
        mbId: 'mapbox.streets',
        mbToken: 'pk.eyxxxxxxxxxxxxxxxxxxxxxxxxxxxxxxxxxxxxxxxxxxxxxxxx',
        channels: ['gps-location'],

Function setView is added to set the initial position from the last know value:

message: function (data) {
            map.setView(data[0].latlng);
         },

Zoom option is set a focus on the position:

options: {
    zoomAnimation: true,
    zoom:16
 },

Finally a following position marker parses the latlng coordinates and show them on the map:

marker: function (latlng) {
          return (new L.Marker(latlng));
        }
 });

Conclusion

In this tutorial we have implemented a real-time GPS tracking system using a Raspberrypi connected to the Cloud. In future articles we will show how to extend this setup using OBD2 adapter and a Bluetooth connection to stream more data from the car to the cloud.


  • 0

Add mobile broadband connectivity to Embedded Linux

In this article we will show how to extend an IoT Embedded Linux System with a broadband connection using 3G/4G networks.

Poky/Yocto is used as Linux distribution in combination with the mobile telephony application oFono.

As hardware example we have a raspberrypi, nevertheless the same setup was applied and verified on other standard development kits and custom boards.

For the broadband connectivity Huawei E173  3G USB stick is used:

If using a different modem, check first if it’s supported with oFono. Here is a list of supported hardware.

Kernel configuration

In order to support 3G USB modems, the following kernel configuration options
need to be enabled :

CONFIG_USB_SERIAL=y
CONFIG_USB_SERIAL_GENERIC=y
CONFIG_USB_SERIAL_WWAN=m
CONFIG_USB_SERIAL_OPTION=m

CONFIG_PPP=m
CONFIG_PPP_MULTILINK=y
CONFIG_PPP_FILTER=y
CONFIG_PPP_ASYNC=m
CONFIG_PPP_SYNC_TTY=m

If those options are used, you should see the following in dmesg:

usbserial: USB Serial support registered for GSM modem (1-port)  
 GSM modem (1-port) converter detected          
usb 1-1.3: GSM modem (1-port) converter now attached to ttyUSB0  
option 1-1.3:1.1: GSM modem (1-port) converter detected          
usb 1-1.3: GSM modem (1-port) converter now attached to ttyUSB1  
option 1-1.3:1.2: GSM modem (1-port) converter detected          
usb 1-1.3: GSM modem (1-port) converter now attached to ttyUSB2


Yocto recipes

To support oFono, the image recipe should include the following packages:

 
IMAGE_INSTALL += "ofono ofono-tests"

To allow ofono integration with network manager connman, the following packages can be added:

IMAGE_INSTALL += "connman connman-client"

Connman shall be then enabled with 3g support:

PACKAGECONFIG_append_pn-connman = " 3g"


Ofono setup

oFono provides a mobile telephony (GSM/UMTS) application framework that includes consistent, minimal, and easy to use complete APIs. It offers a high-level D-Bus API for use and integrate with other applications.

The advantage of using oFono is that very simple to configure and you will not have to deal with any kind of AT commands.

Plug in your 3G modem and check if recognized by oFono:

root@raspberrypi:/usr/lib/ofono/test# ./list-modems

[ /huawei_0 ]
    Type = hardware
    Powered = 1                    
    Serial = 860051019861709
    Manufacturer = huawei
    Model = E173
    Emergency = 0
    Online = 0
    Features = sim 
    Lockdown = 0
    Revision = 11.126.16.04.00
    Interfaces = org.ofono.SimManager 
    [ org.ofono.SimManager ]
        BarredDialing = 0
        Present = 1
        CardIdentifier = 89492019165001742330
        LockedPins = pin 
        PinRequired = pin
        FixedDialing = 0
        PreferredLanguages = de en 
        Retries = [puk2 = 10] [pin2 = 3] [pin = 3] [puk = 10] 
        SubscriberNumbers =

Enable modem:

root@raspberrypi:/usr/lib/ofono/test# ./enable-modem
Connecting modem /huawei_0...

If SIM card is protected with pin, enter the code:

root@raspberrypi:/usr/lib/ofono/test# ./enter-pin pin 1234
Enter Pin for modem /huawei_0...

Depending on the country and Network provider, APN setting is to be configured:

root@raspberrypi:/usr/lib/ofono/test# ./create-internet-context internet.eplus.de
Found context /huawei_0/context1
Setting APN to internet.eplus.de

Now the modem can be set online and activated:

root@raspberrypi:/usr/lib/ofono/test# ./online-modem

root@raspberrypi:/usr/lib/ofono/test#./activate-context

Here is an example script of modem initialization:

#!/bin/sh

#set -x

MODEM="/huawei_0"
PIN="1234"
APN="internet.eplus.de"
OFONO_DIR=/usr/lib/ofono/test

export PATH=$OFONO_DIR:$PATH

enable-modem $MODEM

if [ -n "$PIN" ]; then
    enter-pin $MODEM pin $PIN
fi

create-internet-context $APN
online-modem  $MODEM
activate-context

That’s it! the modem is up and the broadband connection is enabled:

root@raspberrypi:/usr/lib/ofono/test# ifconfig 
eth0      Link encap:Ethernet  HWaddr B8:27:EB:C4:02:82  
          UP BROADCAST MULTICAST  MTU:1500  Metric:1
          RX packets:0 errors:0 dropped:0 overruns:0 frame:0
          TX packets:0 errors:0 dropped:0 overruns:0 carrier:0
          collisions:0 txqueuelen:1000 
          RX bytes:0 (0.0 B)  TX bytes:0 (0.0 B)

lo        Link encap:Local Loopback  
          inet addr:127.0.0.1  Mask:255.0.0.0
          inet6 addr: ::1%694092/128 Scope:Host
          UP LOOPBACK RUNNING  MTU:65536  Metric:1
          RX packets:1120 errors:0 dropped:0 overruns:0 frame:0
          TX packets:1120 errors:0 dropped:0 overruns:0 carrier:0
          collisions:0 txqueuelen:1 
          RX bytes:81280 (79.3 KiB)  TX bytes:81280 (79.3 KiB)

ppp0      Link encap:UNSPEC  HWaddr 00-00-00-00-00-00-00-00-00-00-00-00-00-00-00-00  
          inet addr:10.148.173.91  P-t-P:10.148.173.91  Mask:255.255.255.255
          UP POINTOPOINT RUNNING NOARP MULTICAST  MTU:1500  Metric:1
          RX packets:17 errors:0 dropped:0 overruns:0 frame:0
          TX packets:18 errors:0 dropped:0 overruns:0 carrier:0
          collisions:0 txqueuelen:500 
          RX bytes:1762 (1.7 KiB)  TX bytes:1207 (1.1 KiB)

The cellular connection is also available in connman:

root@raspberrypi:/usr/lib/ofono/test# connmanctl technologies
/net/connman/technology/cellular
  Name = Cellular
  Type = cellular
  Powered = True
  Connected = True
  Tethering = False
/net/connman/technology/ethernet
  Name = Wired
  Type = ethernet
  Powered = True
  Connected = False
  Tethering = False

we can for example enable cellular connection tethering over wifi:

root@raspberrypi:# sysctl -w net.ipv4.ip_forward=1

root@raspberrypi:# connmanctl tether wifi on EmbexuSpot 123456789

If having problem to connect with cellular network, you can use list-modem to check the connection status:

root@raspberrypi:/usr/lib/ofono/test# ./list-modems 
[ /huawei_1 ]
    Type = hardware
    Model = E173
    Powered = 1
    Interfaces = org.ofono.Phonebook org.ofono.ConnectionManager org.ofono.CellBroadcast org.ofono.NetworkRegistration org.ofono.SupplementaryServices org.ofono.CallBarring org.ofono.CallSettings org.ofono.CallF 
    Revision = 11.126.16.04.00
    Serial = 860051019861709
    Online = 1
    Features = gprs cbs net ussd sms rat sim 
    Emergency = 0
    Manufacturer = huawei
    Lockdown = 0
    [ org.ofono.Phonebook ]
    [ org.ofono.ConnectionManager ]
        Attached = 1
        Suspended = 0
        Powered = 1
        Bearer = umts
        RoamingAllowed = 0
    [ org.ofono.CellBroadcast ]
        Topics = 
        Powered = 0
    [ org.ofono.NetworkRegistration ]
        LocationAreaCode = 51906
        MobileCountryCode = 262
        CellId = 33184422
        Mode = auto
        Technology = umts
        Status = registered
        MobileNetworkCode = 03
        Name = Blau
        Strength = 41
    [ org.ofono.SupplementaryServices ]
        State = idle
    [ org.ofono.CallBarring ]
        VoiceOutgoing = disabled
        VoiceIncoming = disabled
    [ org.ofono.CallSettings ]
        VoiceCallWaiting = disabled
        HideCallerId = default
        ConnectedLineRestriction = unknown
        CallingNamePresentation = unknown
        CalledLinePresentation = disabled
        ConnectedLinePresentation = unknown
        CallingLineRestriction = off
        CallingLinePresentation = enabled
    [ org.ofono.CallForwarding ]
        VoiceNoReply = 
        VoiceNotReachable = +491793000400
        VoiceUnconditional = 
        ForwardingFlagOnSim = 0
        VoiceNoReplyTimeout = 20
        VoiceBusy = +491793000400
    [ org.ofono.MessageWaiting ]
        VoicemailMessageCount = 0
        VoicemailWaiting = 0
        VoicemailMailboxNumber = +491779911
    [ org.ofono.SmartMessaging ]
    [ org.ofono.PushNotification ]
    [ org.ofono.MessageManager ]
        Alphabet = default
        ServiceCenterAddress = +491770610000
        UseDeliveryReports = 0
        Bearer = cs-preferred
    [ org.ofono.RadioSettings ]
        GsmBand = any
        TechnologyPreference = any
        UmtsBand = any
    [ org.ofono.AudioSettings ]
        Active = 0
    [ org.ofono.VoiceCallManager ]
        EmergencyNumbers = 08 000 999 110 112 911 118 119 
    [ org.ofono.AllowedAccessPoints ]
    [ org.ofono.SimManager ]
        PreferredLanguages = de en fr 
        SubscriberIdentity = 262032735704422
        FixedDialing = 0
        MobileNetworkCode = 03
        MobileCountryCode = 262
        LockedPins = pin 
        CardIdentifier = 894921002875759225
        BarredDialing = 0
        SubscriberNumbers = 
        PinRequired = none
        Present = 1
        Retries = [pin2 = 3] [puk2 = 10] [puk = 10] [pin = 3]


  • 0

Booting Embedded Linux in One Second !

Booting a device as fast as possible is not only a requirement for time critical applications but also an important facet for improving the usability and user experience.
Most of the Embedded Linux distribution are designed to be generic and flexible to support variety of devices and use cases, therefore the boot-time aspect is not an important focus.
Thanks to its modularity and open source nature it is possible to reduce the boot-time and and achieve some spectacular results just using optimization techniques which does not require any considerable engineering effort.
we will cover in this article an ARM based systems and show a practical example of those tweaks applied to boot a Yocto based Linux on a Beaglebone Black in the blink of an eye:

Before starting any optimizations let’s get a closer look at a typical Embedded Linux boot-up sequence on an ARM processor and analyze how time is spent on each stage :

Boot Sequence on Sitara AM335x


Initial measurements

For our example on Beaglebone black the application is an In-vehicle infotainment (IVI) QT5 based connected application and the goal is to reduce the time from Power-On of the device (Cold-Boot) until the application shows up on the display and fully operable by a user.

To measure the time taken by the application to show its availability, we will use grabserial running on a Host (Ubuntu Linux) to measure time-stamps coming from the target on the serial console:

$ grabserial -d "/dev/ttyUSB0" -e 30 -t -m "U-Boot SPL*"

Important to note that grabserial cannot measure from power-on but starts counting time-stamps upon getting the first character on serial console. In the measurement above we set the time base to SPL using -m option.

Our application needed more than 12 seconds to start-up, from special markers present in the serial logs, we can deduce the time spent on each stage:

such time to start an Infotainment system in the car are unacceptable for an impatient end user.

Optimizations

As a recommendation, do not optimize things that reduce the ability to make measurements and hinder implementing further optimizations.

We start then from the last stage of the boot process, by optimizing the user-space and application start-up, then reduce kernel boot-time. Finally optimize the boot-loader(s).

User Space

Init Process:

One obvious optimization is to configure the Start of the critical application as soon as possible, of course after starting dependencies. In our case we use Systemd so we change the default target from multi-user to basic and remove dependencies to other services as follow:

[Unit]
Description=ConnectedCarIVI service
DefaultDependencies=no

[Service]
ExecStart=/usr/bin/ConnectedCarIVI -plugin Tslib

[Install]
WantedBy=basic.target

As Systemd has an overhead, specially if not running on a multi-core CPU, we can start our application before Systemd initialization by creating a wrapper to init:

#!/bin/busybox sh

echo "-> Start Application..."

#Initialize your time-critical application here !
/usr/bin/ConnectedCarIVI -plugin Tslib &

echo "-> Application started !"

# start real init (systemd/SysVinit)
exec /sbin/init

and instruct the kernel to use it instead of the default /sbin/init, by adding it to kernel command line:  init=/sbin/preinit

A drawback of this Setup is that your application loses some benefits of Systemd such as auto-restart after crash.

If there are many interdependent processes in play, systemd-analyze can be used to inspect those dependencies and reorder their priorities.

Application:

In our example, Qt application alone took almost 0,7s to run!

That could be definitely improved by:

  • choosing toolchains and compiler flags wisely, a new gcc build a faster code, compiler flags set with optimization flags: for example -O2 instead of -Os
  • compiling statically if possible. This will remove the overhead of using shared libraries
  • use prelink which reduce the time needed by dynamic linker to perform relocations
  • in case of a Qt QML based application, using QtQuickCompiler allows to compile QML source code into a binary that runs faster


Root-Filesystem:

Before running the init process, the Kernel needs first to mount the root Filesystem, therefore size and choice of the Filesystem have impact on startup time.

Filesystem Size

Size matters but in this case a smaller footprint will have less mount time. Here are some tweaks to reduce the footprint of a Yocto based Root Filesystem :

  • remove DISTRO features that are not used in local.conf:
    DISTRO_FEATURES_remove = "bluetooth"
    DISTRO_FEATURES_remove = "3g"
    DISTRO_FEATURES_remove = "opengl"
    DISTRO_FEATURES_remove = "wayland"
    DISTRO_FEATURES_remove = "x11"
    DISTRO_FEATURES_remove = "nfc"
    DISTRO_FEATURES_remove = "nfs"
    DISTRO_FEATURES_remove = "ext2"
  • remove unnecessary packages and dependencies from image recipes
  • finally use a lightweight C-library such as musl instead of default glibc:
    TCLIBC=musl MACHINE=my-machine bitbake my-image


Filesystem Type

Depending on the storage type an appropriate Filesystem can be used:

In case of eMMC/MMC, EXT3 or EXT4 are widely used but they have an overhead in compared to other Filesystems such as SquashFS (Read-only):

In Yocto this could be easily generated by selecting:

IMAGE_FSTYPE += "squashfs"

or if using wic kickstart :

part / --source rootfs --ondisk mmcblk --fstype=squashfs  --label root --size 150M

The kernel cmdline need to include:

rootfstype=squashfs


KERNEL

This is an important part of the optimization since a big part of our boot process was spent at this stage.

here are few steps we performed to speed-up kernel loading and execution:

  • build everything that is not needed at boot time as a kernel module
  • reduce Kernel configuration to strict minimum drivers and features that the application need, this implies a lot of trial and error
  • remove from device tree redundant devices or set their status to disabled
  • avoid calibration of loop delay by presetting the value to kernel command line lpj=1990656
  • turn off console output by setting quiet option to command line or disabling  completely printk, which also significantly reduces the kernel size
  • benchmark compressed versus non-compressed Kernel, on our board the decompression went faster than loading an uncompressed image


BOOTLOADER

We enabled falcon-mode to bypass u-boot and focused only on optimizing SPL startup: See our Article about how to enable falcon mode

We disabled in SPL all features that are not required for production such as Networking, USB, YModem, Environment, EFI and Filesystems support:

CONFIG_SPL_MUSB_NEW_SUPPORT=n
CONFIG_SPL_EXT_SUPPORT=n
CONFIG_SPL_FAT_SUPPORT=n
CONFIG_SPL_ETH_SUPPORT=n
CONFIG_SPL_LIBDISK_SUPPORT=n
CONFIG_DRIVER_TI_CPSW=n
CONFIG_SPL_USBETH_SUPPORT=n
CONFIG_SPL_MUSB_NEW_SUPPORT=n
CONFIG_SPL_YMODEM_SUPPORT=n
CONFIG_SPL_EFI_PARTITION=n
CONFIG_SPL_DOS_PARTITION=n
CONFIG_SPL_ENV_SUPPORT=n

As we disabled Filesystems support to have less overhead, Boot-Rom code is loading SPL from Raw MMC partition using specific offsets.

We aslo avoided slow bus initialization such as I2C, for example in the board file we removed the code responsible for board detection using I2C/EEPROM and hard-coded the board type to beaglebone black:

index 48c139a..18c7942 100644
--- a/board/ti/am335x/board.h
+++ b/board/ti/am335x/board.h
@@ -26,27 +26,27 @@
 
 static inline int board_is_bone(void)
 {
-       return board_ti_is("A335BONE");
+       return 0;
 }
 
 static inline int board_is_bone_lt(void)
 {
-       return board_ti_is("A335BNLT");
+       return 1;
 }
 
 static inline int board_is_bbg1(void)
 {
-       return board_is_bone_lt() && !strncmp(board_ti_get_rev(), "BBG1", 4);
+       return 0;
 }
 
 static inline int board_is_evm_sk(void)
 {
-       return board_ti_is("A335X_SK");
+       return 0;
 }
 
 static inline int board_is_idk(void)
 {
-       return !strncmp(board_ti_get_config(), "SKU#02", 6);
+       return 0;
 }
 
 static inline int board_is_gp_evm(void)
@@ -56,13 +56,12 @@ static inline int board_is_gp_evm(void)
 
 static inline int board_is_evm_15_or_later(void)
 {
-       return (board_is_gp_evm() &&
-               strncmp("1.5", board_ti_get_rev(), 3) <= 0);
+       return 0;
 }
 
 static inline int board_is_icev2(void)
 {
-       return board_ti_is("A335_ICE") && !strncmp("2", board_ti_get_rev(), 1);
+       return 0;
 }
 
 /*

All changes made for SPL can be found here.


HARDWARE CONSIDERATIONS

Last but not least, hardware settings can have an impact on boot time. For example the Boot Rom may lose precious time by trying to fetch software from wrong media if the bootstrap pins configuration is not correctly set .

On our board, we also noticed that boot up from internal eMMC configured in SLC Mode is a bit faster than default MLC mode configuration, and even faster than using a fast SD-Card(Class 10).


CONCLUSION

we succeeded in reducing the boot time from 12 second to one second with optimizing different components of the software. The startup time could be further shortened but at cost of the system flexibility.


  • 0

Create a custom Linux Distribution using Yocto

Category : Yocto

The Yocto Project is an open source collaboration project that provides templates, tools and methods to help creating a custom Linux-based systems for embedded products regardless of the hardware architecture.

Yocto Project uses Poky as a reference distribution but it can also creates a custom one. The purpose of this article is to show how to create, configure and build an alternative Yocto based embedded Linux Distribution.

Our custom distribution example mydistro extends the basic settings of Poky and uses alternate distro features and configurations such as systemd as init system and ipk as package manager.

A good practice is to isolate the distro configuration into a separate layer meta-mydistro:

First step is to checkout a local copy of the poky project :

$ mkdir -p ~/Projects/mydistro-oe

$ git clone -b master git://git.yoctoproject.org/poky ~/Projects/mydistro-oe

$ cd ~/Projects/mydistro-oe

$ source oe-init-build-env

Let’s create the corresponding distro layer meta-mydistro using yocto-layer tool:

$ yocto-layer create meta-mydistro -o ~/Projects/-oe/meta-mydistro

Please enter the layer priority you'd like to use for the layer: [default: 6]
Would you like to have an example recipe created? (y/n) [default: n] n
Would you like to have an example bbappend file created? (y/n) [default: n] n

New layer created in ~/Projects/mydistro-oe/meta-mydistro

Now we can define our distro settings by creating a configuration file:

meta-mydistro/conf/distro/mydistro.conf

# Distro Layer configuration
# include and overwrite default poky distro
include conf/distro/poky.conf
DISTRO = "mydistro"
DISTRO_NAME = "MyDistro-Linux"
DISTRO_VERSION = "1.0"
DISTRO_CODENAME = "Guacamole"
SDK_VENDOR = "-mydistro-sdk"
SDK_VERSION="${DISTRO_VERSION}"
MAINTAINER = "info@mydistro.com"

TARGET_VENDOR = "-mydistro"

# Override these in poky based distros
MYDISTRO_DEFAULT_DISTRO_FEATURES = "bluetooth ext2 usbgadget usbhost wifi xattr nfs zeroconf 3g"
MYDISTRO_DEFAULT_EXTRA_RDEPENDS = "packagegroup-core-boot"
MYDISTRO_DEFAULT_EXTRA_RRECOMMENDS = "kernel-module-af-packet"

DISTRO_EXTRA_RDEPENDS += " ${MYDISTRO_DEFAULT_EXTRA_RDEPENDS}"
DISTRO_EXTRA_RRECOMMENDS += " ${MYDISTO_DEFAULT_EXTRA_RRECOMMENDS}"

DISTRO_FEATURES ?= "${MYDISTRO_DEFAULT_DISTRO_FEATURES} ${DISTRO_FEATURES_LIBC} "

PACKAGE_CLASSES = "package_ipk"

# Use systemd as init manager
DISTRO_FEATURES_append = " systemd"
DISTRO_FEATURES_BACKFILL_CONSIDERED += "sysvinit"
VIRTUAL-RUNTIME_init_manager = "systemd"
VIRTUAL-RUNTIME_initscripts = "systemd-compat-units"

Settings provided in meta-mydistro/conf/distro/mydistro.conf override similar settings that BitBake finds in the conf/local.conf file in the Build Directory.

To enable meta-mydistro layer we need to add it first to the bblayers.conf :

$ mkdir -p meta-mydistro/conf/samples
$ cp conf/bblayers.conf meta-mydistro/conf/samples/bblayers.conf.sample

and fill bblayers.conf.sample with the following:

BBLAYERS ?= " \
##OEROOT##/meta \
##OEROOT##/meta-yocto-bsp \
##OEROOT##/meta-poky \
##OEROOT##/meta-yocto-bsp \
##OEROOT##/meta-mydistro\
"

Then select mydistro as DISTRO either from bitbake or in local.conf :

$ cp conf/local.conf meta-mydistro/conf/samples/local.conf.sample

Point DISTRO variable in local.conf or local.conf.sample to use mydistro :

DISTRO ?= "mydistro"

Finally we are able to build an image using mydistro as distribution:

$ cd ~/Projects/mydistro-oe
$ TEMPLATECONF=meta-mydistro/conf/samples/ source oe-init-build-env
$ MACHINE=beaglebone bitbake core-image-minimal